Archive for Downsizer For an ethical approach to consumption
|

sgt.colon
|
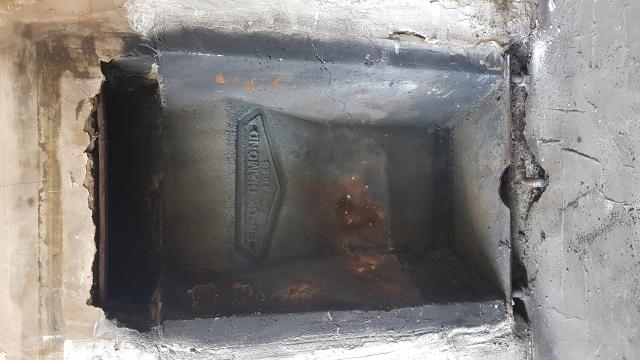
FireplaceI'm wanting to take a fireplace out and thought I would ask you guys for some help please.
Am I okay to knock out the black fire back bit? Also the metal bar that is going across the top, does that need to stay. Then lastly the bricks that run up toward the chimney, can they come out as well? Please see photos.
Thanks  Hmmm I'm not sure why it has rotated the first two pictures. Hmmm I'm not sure why it has rotated the first two pictures.

|
tahir
|
is this a chimney brrreast that projects into the room?
|
jema
|
I'm guessing people will want a wider angle view.
|
dpack
|
that bit of metal should/could be supporting a lot of load and transferring it to the sides like a bridge
you could needle and slot to install a new one higher up to give a higher opening but it probably slopes in from the sides a couple of bricks above the metal which limits the gains
just pulling it out might be a very bad idea   please don't, tis dangeroos and expensive to fix if done wrong. please don't, tis dangeroos and expensive to fix if done wrong.
what do you want to make it bigger for?ed for bold
taking out the old fire back is not problem, they can often be removed with a few decent wiggles with a wreaking bar and a pull, if not break it up and take it out a lump at a time(they do have a small second hand value if they are not damaged but that seems to be cracked so brutalize if it is not loose
but leave the metal for the mo, that sort of thing needs doing right
|
buzzy
|
Personally I would get a professional in to sort it out, or at least give you detailed advice. And there must be building regulations. From my limited knowledge there are all sorts of requirements about angles and widths of chimneys, and getting it wrong runs the risk of carbon monoxide poisoning, as well as loss of efficiency.
Take care, whatever you do.
Henry
|
dpack
|
" or at least give you detailed advice"
hi
|
dpack
|
ps the rubble behind the fire back can go as well, get back to brick and we can take it from there
pps i got about 150 of 16th and 17th C bricks from behind the last one i did
bomb damage bulk rubble is usually carp, that was treasure
|
Slim
|
Definitely need more context. What's the end goal?
Is there a reason why not just bricking up the opening and pretending it was never there?
Or do you want that to be usable one day?
|
Ty Gwyn
|
Sounds like preparation for a wood burner installation?
|
sgt.colon
|
Thank you all for your replies.
I thought the metal might be important and didn't want to just whip it out, so asked the question. It's not a problem leaving it there.
It was more for the black fire back. That needs to come out as Ty is correct, a wood burner is going in there.
We have a plasterer coming on Friday to plaster the room and I just wanted to have around the fire sorted so there is little disruption once the plastering is done.
|
Ty Gwyn
|
Are you making the opening bigger as you inquired about taking the steel support out?
|
tahir
|
Is this a breast you’re removing? Or are you leaving the breast intact and putting a wood burner where the fire used to be?
|
dpack
|
ppe for removing the fire back should include gloves and at least a dust mask+eye protection.
mucky beasts, even if they can be got out easily
|
dpack
|
ps no matter how old they are the deposits are toxic long and short term, ppe and hygiene 
|
sgt.colon
|
I'm just trying to get it ready for the whole room plastering on Friday, so I was just going to remove the back bit. I just thought I'd ask about the piece of metal going across.
The breast is staying and we will only be using the hole that is already there. Mrs C has measured and with the back bit out the hole is big enough to put the wood burner in. It's not a very big burner, as we only need it to warm the living room when we don't really need to CH on heating the whole house.
I've got my glasses, mask, gloves and ear defenders all at the ready. 
|
Nicky cigreen
|
I think i would want to remove more of the plaster on the front of the chimney breast to establish there is a proper lintel or arch of bricks offering support to the higher chimney breast further up. We have opened 3 fireplaces like this and in 2 cases there was a useless bit of metal doing nothing which we removed and further up a good arch of bricks. In the kitchen we found someone before us had removed the arch to make room for a rayburn and hadnt replaced it with anything at all.. and only habit was holding it up.... hence the general sagging of that chimney breast.. we put a steel in further up.
|
wellington womble
|
Your house is so full of good habits!
|
Mistress Rose
|
I would think a bit harder about the wood burner. For a start, what size logs will it take and can you get them easily. Do you really just want to heat that one room or would it be useful to heat the house a bit as well by leaving the door open. What about cooking on it.
A customer of ours took advice from an installer and had a tiny wood burner fitted that will only take 8" logs and just heats that room. It has certainly been the bane of our life ever since, as delivery to that house isn't easy, and carting 8" logs is a pain. I don't think he was too happy about it either, but his wife had it done.
I know you want the room plastered, but it might be as well to investigate further about arches etc. before that is done.
|
dpack
|
what they just said, i could add many horror stories about chimneys but won’t, it looks as though it probably does not have an arch as it is quite narrow but if you are having a full replaster getting eyeball on the chimney breast face is not a big issue
i have made a few bigger by finding a brick arch or stone lintel but iirc your house is mid 20thC and that was not a kitchen fireplace(or all purpose one)
eyeball good, but i suspect the size of hole you get by removing the fireback is the limit without serious engineering
re small logs, tis ok if you forage your own wood, delivered to fit is an issue
|
sgt.colon
|
Thank you everyone for your replies, some things that need thinking about. I'll get the back out and post some pictures.
I think I'll get him to do the room but just leave the chimney breast for now, whilst we see what we've got.
Thank you everyone
|
dpack
|

ps if you are going to put a burner in the hole, it is worth asking your spread if he does cement/lime/additive renders as the brickwork will be saturated with tars and chems from coal fires which bleed through plasters and make tiles fall off,
it needs to be able to cope with thermal expansion without cracking as well.
functional chimney breast refurbishment has a few specialized areas , tell your spread what you want to use it for and report what they say:wink:
ed if you are going for burner, tis worth having the hole a decent shape etc for fitting the plate that holds the insulation and flue pipe up the chimney
a small aside but some folk pop a slab down and put the burner in front of the chimney breast with a sloped pipe before the vertical one
not ideal but it can work if done well
|
Nicky cigreen
|
Your house is so full of good habits! |
it is and it isn't - it is mostly slowly slumping....
In my experience, buildings fail slowly, not in a sudden whosh. Habit does hold things together for a while. Then a crack appears.. or a floor feels a bit too bouncy, or a door no longer fits.. and it is time to take a look.
|
Nicky cigreen
|
if there isn't a decent arch or lintel, it isn't a biggy to slip one in and make it good.
|
dpack
|
yep
|
sgt.colon
|
Thanks for all that DPack.
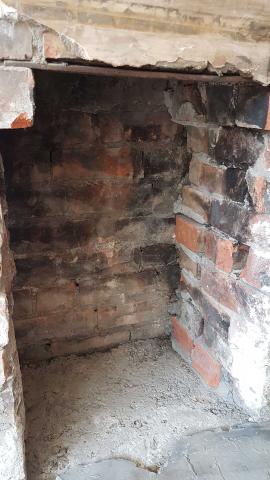
Fire back out and this is what there is.

Now these bricks that are sloping up, should I remove them?

Thanks
|
dpack
|
seem to be chimney/fireback lining,
they look loose any way, pop one off carefully and retain it and see if you have a void or rubble infill behind the bricks that were behind the fireback
|
sgt.colon
|
Thanks DPack, I'll pop one off and report back.
|
Ty Gwyn
|
Are you re-plastering that fireplace wall or just making good?
As looking at the side brickwork I`d say the original opening was bigger.
|
sgt.colon
|
Ty, we are plastering the inside but if possible would like to make it wider and deeper.
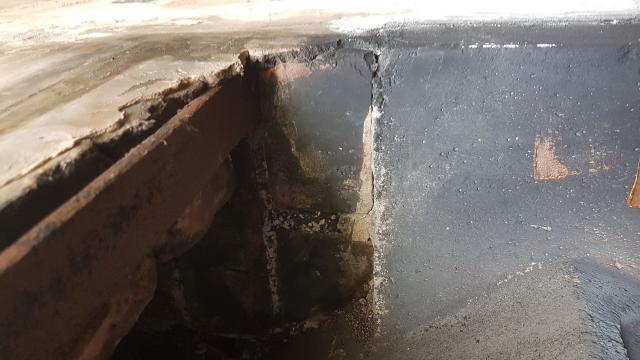
DPack, here are a couple of shots after I removed a couple of those bricks. I'm not sure if you can make it out but it looks like the chimney wall just continues down behind the back bricks.


|
Ty Gwyn
|
When them firebacks are built into existing openings,that is how they look,the backs are bevelled up the existing back wall for soot to fall freely not accumulate and cause a fire on a shelf,same with the sides.
If you hack off the plaster eitherside of your opening you will see the width of the existing opening.
|
dpack
|
yep
|
dpack
|
strip the front face and we can see the bricks
it does start to look like it was reduced from a larger hole that is structural
|
sgt.colon
|
Thank you both. I'll get back to it with my hammer and chisel and report back, with pictures.
|
Nicky cigreen
|
at my parent's house one fireplace - when the plaster was stripped from the chimney breast there were signs of multiple alterations over the years - a big fireplace made into a smaller one, then made smaller still to fit a cast iron insert.. They choose to open the fireplace up to the middle size one
|
dpack
|
Thank you both. I'll get back to it with my hammer and chisel and report back, with pictures. |
let me see what you have there, wide is a surprise for the age of house but not implausible.
if it is wide it increases the options for burner style
sgt.colon
|
Okay, then back bricks have been knocked out and I've knocked the plaster off down one side. Looking at it I'm think we are at the original width?
Also, I need to reset a couple of bricks on the right hand side. Is it just a normal mortar mix? Thanks


|
dpack
|
get the rest of the plaster off and show us a face on full w/ht snap from further back and as close to 90 degrees on as you can manage
|
sgt.colon
|
Ah, okay. I will do. I'll do that tomorrow and report back. Thanks Dpack.
|
Ty Gwyn
|
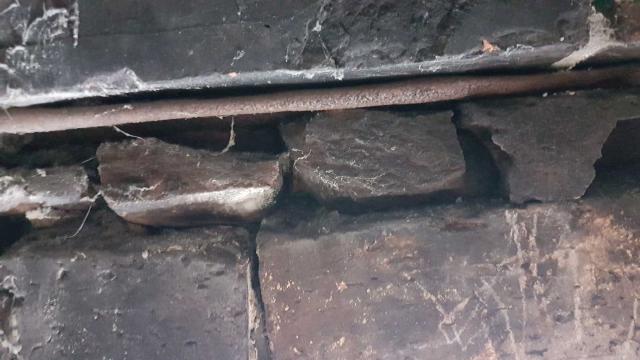
Them 2 bricks either side that step in under the steel bar show that it has been narrowed,the brickwork on the right side has plainly been added later,cannot see the inside left as plain.
Can you show a photo of the whole wall,as sometimes a fireplace is moved to one or the other sides not always central according to the way the flue goes up.
|
dpack
|
it does look that way at the mo, it would be good if it is like that
|
sgt.colon
|
Not taken plaster off yet but I've done some more shots. One is of the fireplace and the other three are up the chimney. As you can see there is another steel lintel a brick and a bit up. Obviously I cannot see how many bricks across it goes.


P.S. You guys are good!
|
Nicky cigreen
|
you probably wont want to get a bigger woodburner - you need to size it for the room rather than the fireplace - but if you have space enough to stick a kettle or dutch oven on top of the burner, that is a huge advantage. or there are some models with a mini oven built in.
|
dpack
|
you do have space
|
dpack
|
in the morning chat
|
Mistress Rose
|
Sorry Nicky, but I have to disagree with you unless you always want to keep the door shut. We have a larger one, and with the door open, it provides some extra heat to the rest of the house. Keeps the central heating off a bit more in winter. As I also said in that post, having a flat top and room to put pans on means you can cook on it too.
|
Slim
|
It can be nice to have a hot room that keeps the other rooms from being too cold
|
dpack
|
flat top is ace, warm a crumpet then toast it with the door open
other foods are available
as to room /house heat the little heat driven fans seem good
tiny is a pita, a bigger un does not need to be full if it is a good un and it gives scope for a range of wood sizes/types and burn styles
from what we see so far that opening is bigger than the fireplace you removed
when the plaster is off the front face we should have enough data to give decent advice
|
sgt.colon
|
OKay, I've found the original fireplace opening.

|
dpack
|
up to the brick arch and the 1 1/2 brick sides that have been added as infill to hold the fireplace can go by the look of it
looks like it was build for a smallish coal range or similar
cut the bricks that have been keyed in to the sides or if they fall out replace them with halves
|
sgt.colon
|
Thanks for all you help on this DPack and Ty et al. I'll get them removed this weekend.
We wondered why the chimney breast was so big for such a small fire.
|
Nicky cigreen
|
Sorry Nicky, but I have to disagree with you unless you always want to keep the door shut. We have a larger one, and with the door open, it provides some extra heat to the rest of the house. Keeps the central heating off a bit more in winter. As I also said in that post, having a flat top and room to put pans on means you can cook on it too. |
Woodburners are designed to be used with the doors shut, are far more efficient and have a cleaner burn used that way. IDK how the rules have changed but when we were putting one in, if we went for a larger model we would have been obliged to put an air vent in too - something else to consider.
Nicky cigreen
|
OKay, I've found the original fireplace opening.
|
yay, nice looking arch - exciting
dpack
|
i was a bit surprised iirc the house must have been built at the coal to leccy/gas heating etc
a decent size hole is useful
if you are going for a burner it will require a proper flue, not just for safety but to make sure it actually works
in an existing chimney a(straight as poss/strong as poss) double skin pipe and vermiculite to back fill the space between that and the brickwork is a minimum spec
i have one of ours ready for that stage
the back of the hole has 100mm of rockwool under a thick fire proof board(cement,sand and rockwool iirc) the sides and front are done in 1 lime/1 portland/4.5 fine sharp sand
i had a bit of shedding with the limewash and tings over that as it dried but the solid stuff is well sound and works well for such things
a reflector at the back with insulation behind it is very nice
adding lime to the renders makes them more stable to thermal expansion things
it is a decent size hole losing 100mm with board and rockwool and bolts and spacers might be a good idea
if you have it rendered straight onto the brickwork, which will be full of all many of interesting chemicals, it does need specialist plastering and protocols to end with a clean surface
|
Ty Gwyn
|
By Double Skin Pipe,do you mean the better grade flexible chimney liner?
|
dpack
|
double skin yep and insulating vermiculite, it gives a hot inner tube that assists the draw.
a chilly flue is barely a flue
flexible or ridged depends on the shape of the chimney
use a good grade and only do it once and safely
you do need to clean it regularly so using decent kit with access etc is sensible
a reputable installer should give you a good spec for this part of things
expect to spend as much on flue as on the burner(unless you want a very fancy burner)
|
sgt.colon
|
II think we are thinking of of just leaving it all brick, even inside the chimney breast.
I'm getting the additional bricks out today and removing some more plaster. When I've done I'll post some more shots for your enjoyment.
Thanks again everyone for all your advice. Invaluable as always.
|
Mistress Rose
|
Proper installation is very important. As Nicky says, for safety you must have sufficient air, be that from a vent or other means. As we always have the door to the room open, we get plenty of air movement although the room is probably large enough to take the fire. It is also worth getting the installer to check that the chimney is high enough as too low a chimney can result in a poor draw, particularly with the wind in certain directions.
|
sgt.colon
|
Thanks MR. We are going to check out a few local installers to see what their advice is. Suffice to say, we won't be doing the installing of the burns. I'm just here to do the monkey work.
|
Mistress Rose
|
We did install our own, but many years ago. I think these days you are supposed to have it installed by someone with the right bits of paper, but make sure they really know what they are doing too as paper is easy to get buy real knowledge isn't.
|
Ty Gwyn
|
Reason I asked was a non trade person may mistake Double Skin for Twin Wall,which are used externally or internally but not inside a flue.
904 grade is the better of the 2 grades available.
Regarding the insulating of the flue,having installed many types of fireplace over the years,especially when doing my apprenticeship with a local builder,from open fires to ones with back boilers to rayburns and to the latter period mainly rayburn and parkray central heating fires,with the rayburns and parkrays the cast flue pipes we used then were only sealed a short distance up the flue by parging/shamfering up the sides of the existing flue,and the systems worked perfectly well,the liners have only really come into use since carbon monoxide poisioning due to old damaged flue`s or poorly fitted appliances,unless one has a fairly modern house with earthenware built in liners,its a no brainer not to install a stainless steel liner,personally I`d go 6in flexible.
|
dpack
|
good calls on flues etc, i would use my skills finding a good installer and take advice for that chimney/burner combo
|
sgt.colon
|
Thank you both. A liner is just a step to far for me so we will be finding an expert.
Anyway, the moment you have all been waiting for.......the finished fireplace.

and we love it.
Thank you for all your help everyone. We wouldn't have been able to do it without you.
|
dpack
|
nice.
if you are going to leave the bricks on show give it a wash down with sugar soap,(nasty job and try to avoid ingesting or absorbing the muck) let it dry and seal them to avoid the mortar shedding crumbs
|
Mistress Rose
|
That looks nice. As Dpack says, it would look good exposed, but as it is old it might do better with a suitable sealant. We haven't coated ours at all, but it is new, so the brick is in good condition and has never had plaster on it.
I would suggest rubber gloves, overalls and eye or ideally face protection while washing with sugar soap. Follow the instructions on the packet, and if you get any on you, wash immediately. Don't splash it around if you can avoid it.
|
dpack
|
the sugar soap is less of a problem than the tars, phenolics, dioxins etc from years of coal smoke on the brickwork
a wire brush and paraffin can help loosen stubborn stains
if you do decide to render it the modern additives for that purpose and 3 coat work will prevent bleed through falling off etc
line with rockwool and fireproof board at the back and render the sides can work well
whichever way you go it needs a bit of a scrub first so do that and see if it looks good enough to keep as bare brick
|
Ty Gwyn
|
The righthand side doesn't look coal burned making me think there might have been a hob grate insert,
2 photo`s of the left and right sides would determine that idea,and a close up of the back.
|
Nicky cigreen
|
looks great - Sgt C - well done. What do you plan for a hearth?
|
sgt.colon
|
Thank you for the cleaning tips peeps.
We have decided that we are going to plaster the breast but leave the brick on display in the fireplace itself.
Ty, here are the pictures you asked for.


Also, I take it this brick is supporting the arch? If that the case, would I be okay to remove the brick to reset it at a straight?

Nicky, because we are leaving the brick exposed we are either going to go with a plain tile or Mrs C said she has seen some sort of concrete hearth. Which I've not seen yet.
|
dpack
|
that does look like it might have had a hob hearth and maybe a small side oven as the original
next thought, is the floor slab
A sound
and
B big enough?
the latter make a lot of difference when messing about with logs, embers or ashes
a couple of feet deeper than the door would my minimum
if the structure is sound a decent sized "hearth stone" can go on that
i had to excavate, concrete and add a nice slice of marble to what was the parlour fireplace hearth. the one that had been the kitchen range and is now ready for a burner just needed loads of proper concrete
original hearths are often a little shallow in both size and structure,
burners need a solid base and space in front of the door to fiddle with them, spill soup etc
|
sgt.colon
|
Thanks for that DPack. I need to have a look at what Mrs C has found. Dropping something solid in there will be easier that tiling and possible easier to keep clean.
Did you see the photo with the sticking out brick in? What are your thoughts please on me removing the bricks and straightening it or even removing them if they are not needed.
Thanks.
|
Ty Gwyn
|
Regarding them stepped bricks that support the arch,if you want to remove the stepped support,the correct way
would be to replace with a flat steel band,bend to the radius of the arch,easy enough when building it,but not so to match existing arch,beings your plastering the face you could drop the lower part of arch,fit flat band and replace bricks,
But thinking again,you could make a template with the correct radius and get one made with a blacksmith.
Just a suggestion, of what I`ve done on an ongoing installation,for an hearth,is a piece of slate,5ft by 18ins set on a course of Staffordshire blue bricks with a Flemish bond,header ,stretcher etc.
|
jema
|
That is an impressive transformation
|
dpack
|
i might work with the stepped bricks, make them an interesting feature not a problem
at this stage doing metalwork seems unnecessary
|
Nicky cigreen
|
I expect you know, or maybe someone has already said, but there are rules about the size of the hearth - it has to stick out so much further than the woodburner etc.
we made one with reclaimed granite paving stones bedded in limecrete, and the kitchen one has the original hearth stone at the front and we just laid cement on the back. Both have time capsules underneath...
|
sgt.colon
|
I'm now wanting to start laying the hearth. We are using tiles and I've been looking online about what sort of adhesive to use. Places like Topps tiles say to use a heat resistant adhesive, where as people on forums say about using just a flexible tile adhesive.
So I thought I'd ask what you guys thought?
Thanks
|
Ty Gwyn
|
The only hearths i`ve ever put down have been one piece Slate or Blue Pennant Sandstone and old type quarry tiles all cemented down.
|
dpack
|
heat resistant adhesive, good spacing, heat resistant grout
or
press them into a decent thickness of lime and cement mortar, screeded flat inside a frame to shutter the outside edges
level them with a board, grout when set
|
sgt.colon
|
Thank you both.
|
dpack
|
ps if you are playing with tiles do a "dry"layout first
cutting as you go is a nightmare even for those who do it regularly
if you need to cut do you have access to water cooled wheel cutter?
they work far better than scratch and snap
|
gz
|
Good advice, does a good job, keeps the dust down, easy to use...earmuffs advisable
|
Slim
|
I only needed to cut two tiles for our stove's hearth, and I ended up buying a tile cutting wheel for my angle grinder. Wore a good mask and did it outside, easy peasy clean line and no need to rent a wetsaw.
We were just making a rectangle with dimensions of the tiles as guides, however. Might not be worth it for lots of fiddly cuts to squeeze into an old fireplace.
|
sgt.colon
|
Funny you should mention those things DPack. Mrs C and I were only talking at weekend about laying the tiles out before I lay them as they are all different patterns and colours, so we want a good mix.
I was also talking to a lady at work a few weeks ago about laying a hearth and she said she had a wet tile cutter I could borrow. So it's sat in our house now just waiting to be used.
|
dpack
|
have a practice before you go for the important ones
it is messy so outside is good as is decent ppe
i cut jet with my one, that is very messy, black/brown splatter is rather victorian black and red devil from whitby
the glaze on tiles can do good shrap in an eye, but any tile can do chunks
most will cut nicely with nowt worse than some slurry spray
put enough water in it
use a push stick if you need to cut close to the disk
be careful of sleeves, hair etc
when you measure and/or dry fit allow for the width of the disk, most take about 3 to 5 mm as a bite
you need to measure to the side of that line
|
sgt.colon
|
Thanks DPack. That advice is much appreciated.
Pictures will follow once I'm done.
|
sgt.colon
|
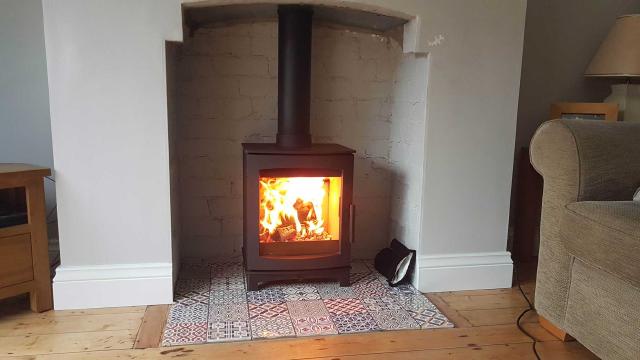
Finally finished the fireplace. Just a few touch ups after the install this morning but I'm really pleased with the final finish.
Thank you for all your help everyone. I wouldn't have had the confidence to do it without your advice.
|
dpack
|
well done, that looks nice and functional
|
sean
|
Very smart.
|
gz
|
The arch really sets it off..far more pleasing than a straight line!
|
jema
|
Nice one
|
Mistress Rose
|
Very nice. If that is a new stove, they suggest a small fire to begin with to cure the paint off properly. It will smell horrid at first, but the smell fades after a few days.
|
Nicky cigreen
|
lovely
|
Home Home Home Home Home